A New Endeavor

At one time I was really good at sending cards – Christmas cards, birthday cards, graduation cards. Then my 2nd son was born less than 2 months before Christmas, and I decided I would be forgiven for missing the ritual that season. Then I was too tired to send birthday cards in the early part of the following year. Then I decided it wouldn’t be fair to send cards to the people who had birthdays and occasions in the 2nd part of the year when I’d missed the 1st part. Then I just quit.

So this year I wanted to start fresh and get back in the habit. And because I’m a little crazy that way, I decided to make all the cards I send.

I’ve never made cards before, a little strange given all the scrapbooking I’ve done over the years. It always seemed like so much work to just be thrown away. At least my scrapbooks will be thrown away after I’m dead so I can happily pretend my great-great grandchildren will be reading them. But my scrapbook supply pile? Not getting any smaller. Let’s call it ‘creative repurposing’. So here are a few of my first attempts, all designs ruthlessly scraplifted. Of course.

Anniversary Card for Hubby

Birthday Card No. 1

Birthday Card No. 2

The last one is my favorite. So much so that I’ve refused to send it to anyone yet. I love the dandelion paper, and fuschia is my signature color.

Now I need to go make Mother’s Day cards so they can arrive before Father’s Day…

Is That a Scrapbook Page?

 Holy cow. I actually started and completed two scrapbook pages this week!

Quentin's 5 Things

Corbin's 5 Things

I think I’ve always been a crafter. I remember always being a crafter, but since we all know that memory is a tricky thing, my mother will have to confirm or deny that allegation (although I’m sure she will point out that I showed zero interest in cooking or sewing). But scrapbooking was really a gateway drug to my current crafty obsessions.  And strangely I find myself rarely doing it anymore.

I often feel disappointed with the scrap pages I create now; I want them to be better. Being a beginner is all sorts of giddy fun – discovery and playfulness and no pressure to perform well. I don’t do well once that shiny newness has worn off (which totally explains my last two years of college). Paper still makes me dizzy, and I’ve been known to literally squeal at images in scrap magazines, but I’m not sure how to go about taking that next step to up my game.

6 Years Old

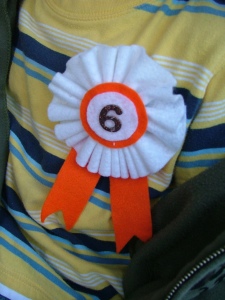
Yesterday was my oldest son’s birthday – Happy Birthday, Q! The night before I stayed up much later than I should have getting this little tidbit made…

Felt Birthday Ribbon

No pictures of my process because I don’t have any decent light for photos in the house after the sun goes down. I just sewed one end of two accordian folded pieces of felt, each about 1.5 yards long and 2 inches wide. I fanned those out and used my trusty hot glue gun to stick them together. The hot glue gun also attached the two circles I cut, the chipboard number, and the orange “ribbons” to each other and the folded circle. I glued a pin on the back, and it was done. He wore it proudly.

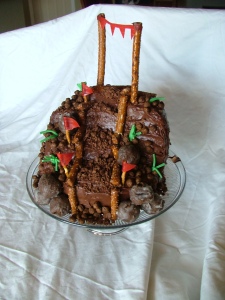
On the agenda yesterday morning was getting the cake decorated to look something like this. I baked all 4 of the required round cakes the day before and stuck them all in the freezer. I think it turned out pretty good…

My Motocross Cake

I only used 2 cans of the frosting but didn’t mind having the extra can because one of my pet peeves is recipes that are stingy with the frosting. I also didn’t add the straws because of the freezing. And yes, as a matter of fact I did have to attempt sticking a straw in there before I realized it wouldn’t work! Here’s the cake with the addition of the motorcycle and rider…

Motocross Cake with Rider

Baby Book

I’ve been obsessing over my new scrap project. I offered to make a baby book for my sister-in-law months ago. We went over some basic guidelines of what she wanted, and then I promptly got so anxious about getting it ‘right’ that I did no actual work. Over Easter weekend (while we were in Phoenix for the wedding at which I wore the fascinator I made), I used a blanket from the bedding to get the colors right. Good thing too – the few sheets of paper I picked up as a guess were completely wrong! I don’t want to share too much here before I actually give it to the expectant parents, but I am so excited about the first few pages that I had to post a sneak preview…

Introduction Page

Giraffe Stamp

Felt Coasters

I’ve been wanting to make felt coasters ever since I first spotted the craft in a magazine (I thought it was Family Fun but I can’t find it on their site). I was thinking Christmas gifts, but, as usual, my holiday-crafting-plan eyes were much larger than my holiday-available-time  stomach. A few weeks ago I did manage to snag a bag of cork coasters at one of the local craft stores, and when I realized my husband was putting his glass of water on our newly-inherited Heywood-Wakefield dresser with just a tissue under it, I knew it was time to put them to us.

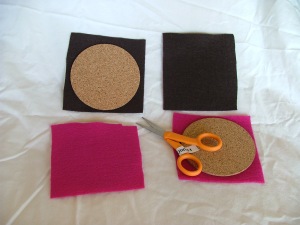
I decided to skip the sticky back felt in the original (wherever that may be); I’ve never seen any in colors that I particularly like. I started by cutting squares of eco-felt just slightly larger than my coasters.

felt, cut to size for coasters

 Like my labelled scissors? I had to do that when working on a project that had me going between cutting paper and cutting fabric. I’m easily confused.

Next I put felt glue on the back of a coaster and used a paintbrush to make sure it was completely covered all the way around.

felt glue "painted" on cork

Then I put the felt squares on the glue-y cork, pressing it down firmly. Some of the glue seeped through the felt, but it hasn’t seemed to affect the performance. Yet. I let the glue dry overnight because as the mother of small children I am regularly forced to abandon craft projects. The felt glue label recommends at least 3 hours of  drying time.

drying time

And right here would be the picture of me cutting the excess felt from around the cork if I had managed to get one. I’ll blame it on finishing at night and not having any decent lighting for photos. Next time I’d like to try doing multiple colors on each coaster. Polka dots would be perfect, but I’m not sure I have the talent or the patience to get all those circles just right…

Wedding Fascinator

One of the most wonderfulest women in my life is getting married in a few weeks, and I feel so blessed to be her maid of honor. Instead of asking the wedding party to all dress alike, the brides asked us to dress in black with touches of a dark, wine red. I saw a lovely feathered fascinator with a small bit of veiling attached in a bridal magazine and decided to make one for myself in black and red. The wedding is fast approaching , and the only thing I’ve managed to get done for this project was buying a few silk flowers and seeing how much black veiling might cost me (off the internet because I couldn’t manage to find it in town). Then last weekend I was wandering around Forever 21 (aka crack house for the accessories whore) and stumbled across EXACTLY what I had been planning to make, minus the red flowers. For $9. At that price, I was not about to try to reinvent the wheel. I originally bought a silk hydrangea, rose, and orchid spray in the right color because I wasn’t sure what would work best. Given the hair piece I bought, I decided to use the hydrangea blossoms. And because I rarely think things could be made better without glitter, I decided to glitter them.

hydrangea blossom

Hydrangea Blossom

I detached the smaller blossom bundles from the main stem (just pull) and then clipped the individual blossoms off with scissors (no wire in this part).

clipped blossoms

Clipped Flower from Small Cluster

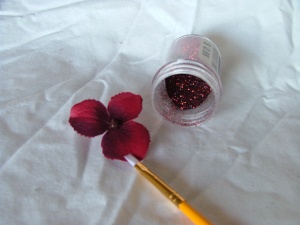
I used a small paintbrush to paint dilute glue (just the plain, white stuff 1:1 with water) around the edges of each petal and dipped them in glitter. I created the glitter color by mixing the red and black glitter from a Martha Stewart card kit I found on clearance at Wal-Mart.

glittering petals

Glittering the Petals

After drying, the glitter still showered off like I hadn’t bothered to glue it at all so I sprayed an acrylic sealer over them. It helped, but I imagine my hair and shoulders will still be covered by the end of the night. Then it was just a matter of using the hot glue gun to attach the blossoms to the fascinator.

adding flowers

Adding Flowers to Fascinator


finished fascinator

Finished Fascinator

Now I just need to add some glittered blossoms to the ribbon I plan to wear as a belt, and my outfit will be complete.